LAYERED PUMPKIN CHEESECAKE


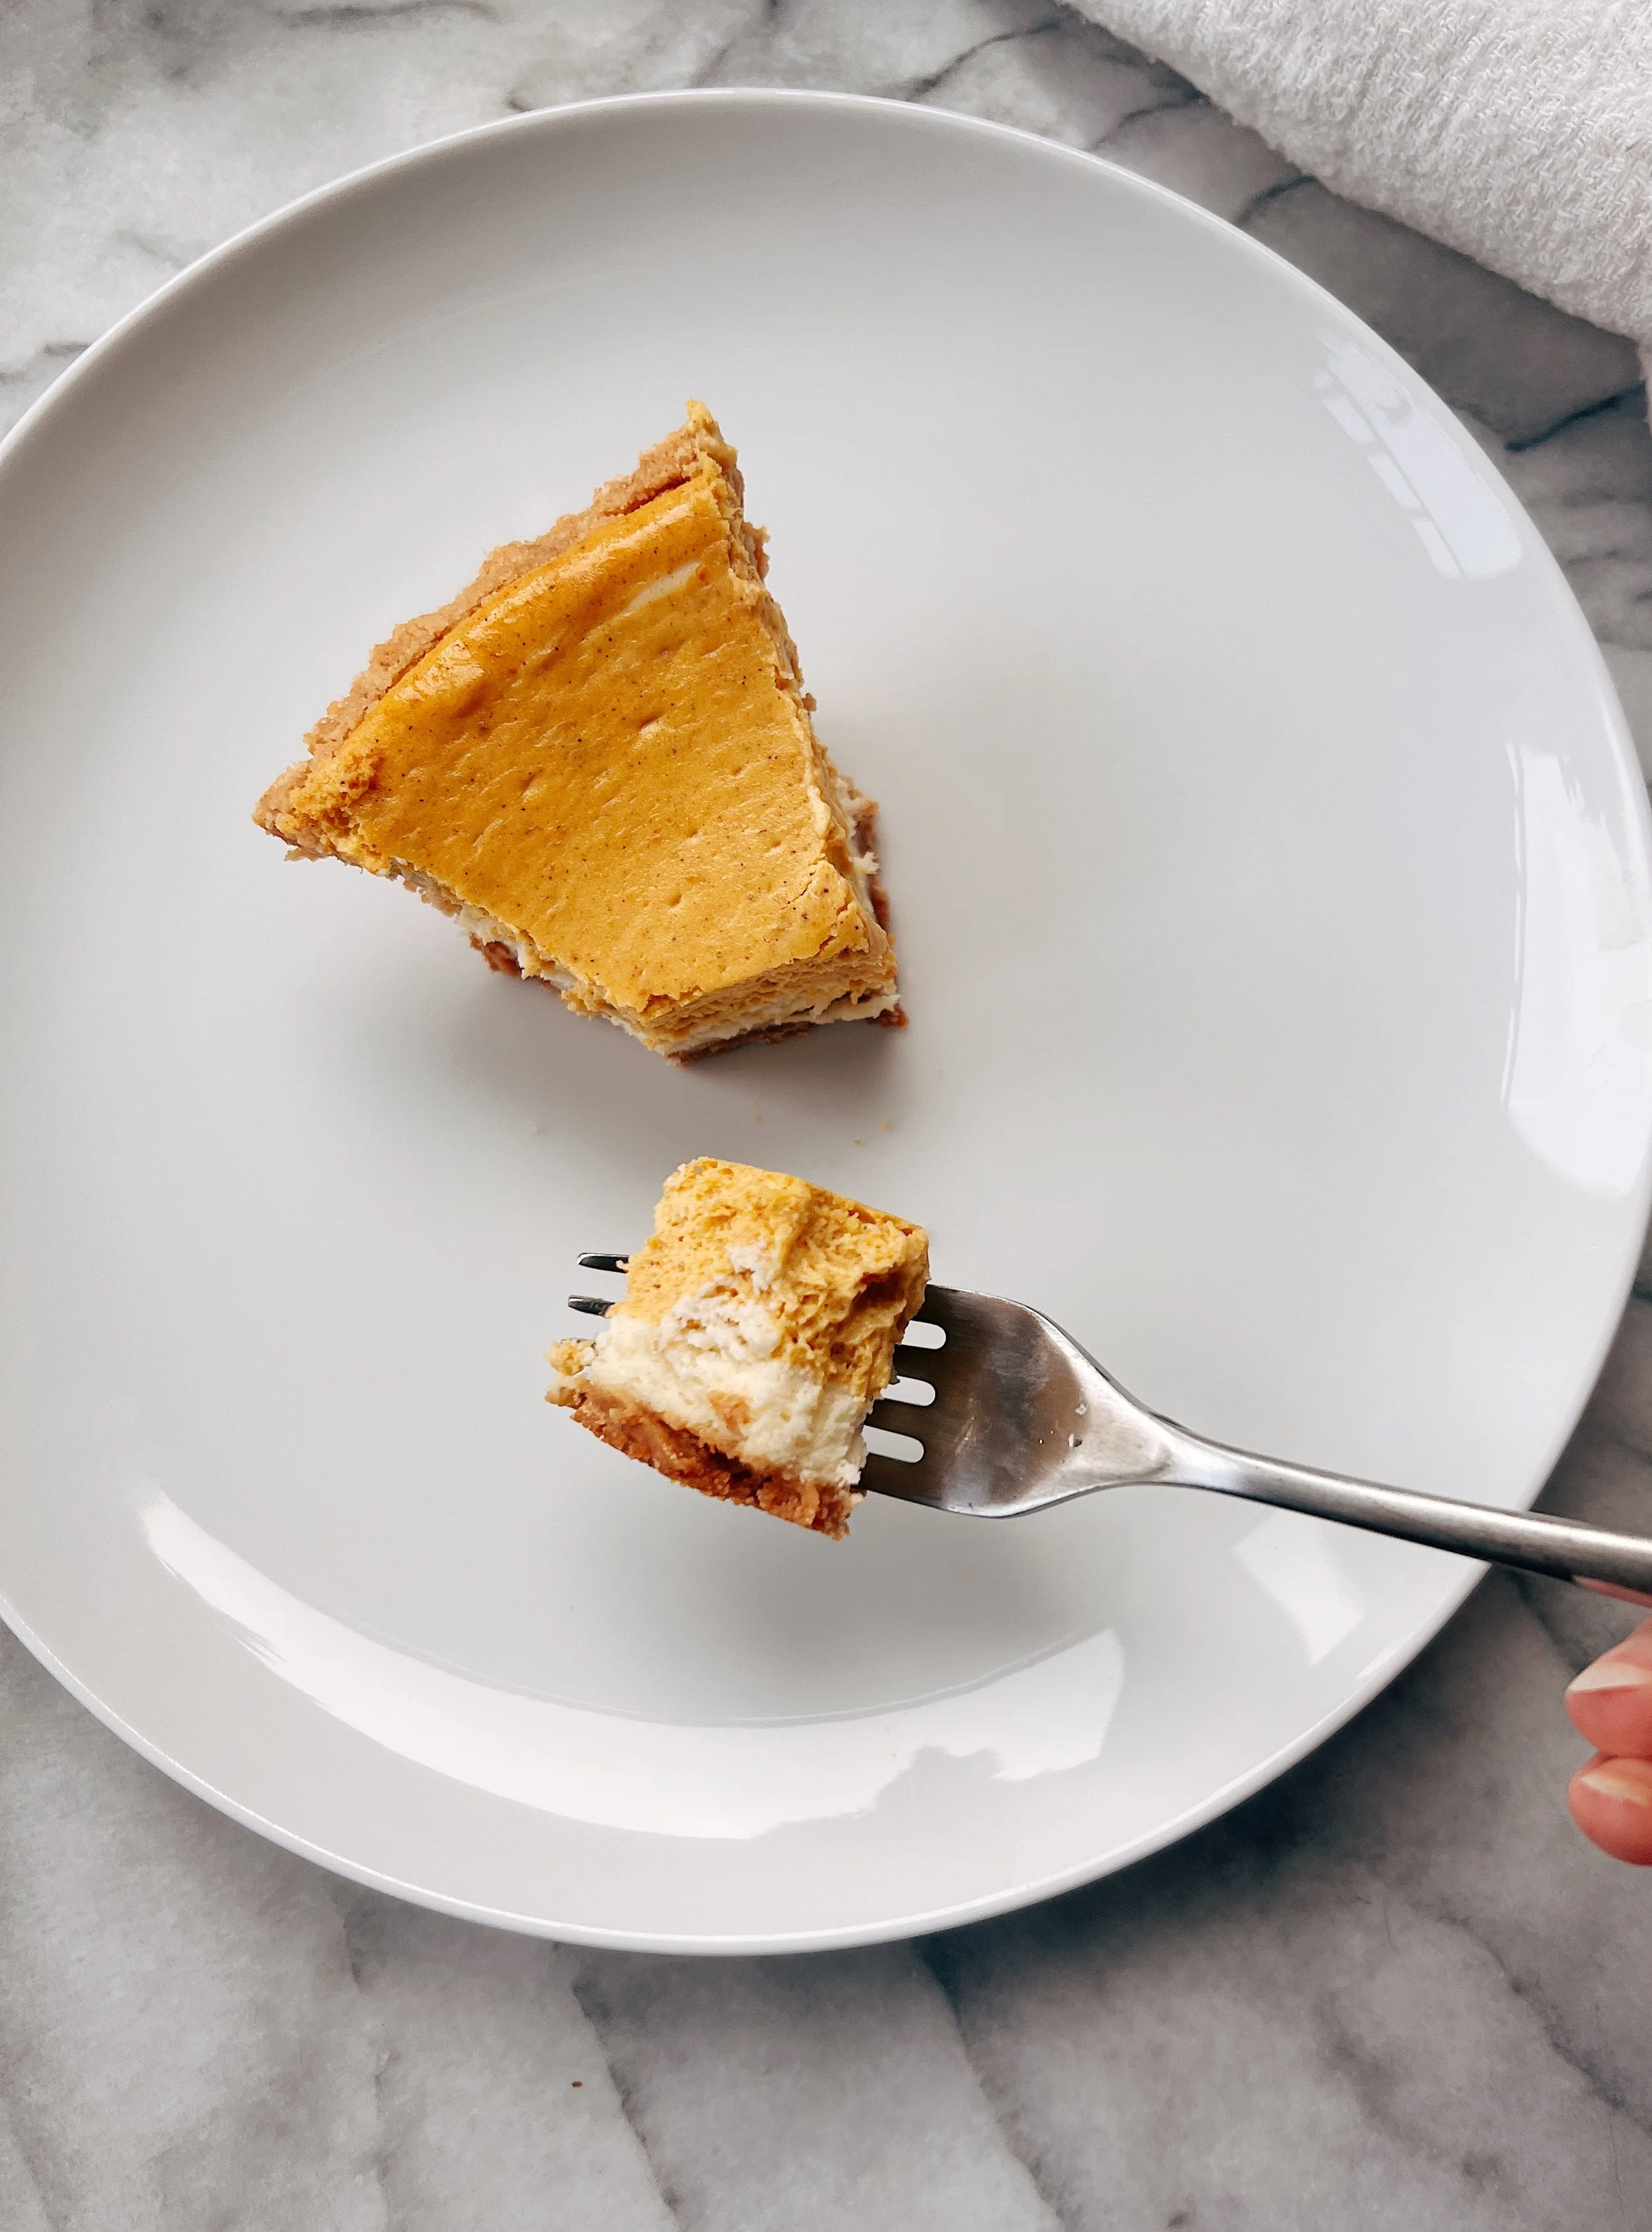
Fall sure if taking its time to hit the PNW this year with the temps still in the mid 80s. Sweating at the pumpkin patch reminded me of being in LA in October which I didn’t love. But nonetheless, we can channel Fall flavors with delicious and COLD Layered Pumpkin Cheesecake! This is a super easy to make and could be made with store bought graham cracker crust if you’re in a time crunch. Or just lazy. No judgement.

WHAT YOU’LL NEED

16oz room-temp cream cheese
1/2 cup white sugar
1/2 teaspoon vanilla extract
2 eggs
1/2 cup pumpkin puree
1/2 teaspoon Pumpkin Pie Seasoning
1/2 teaspoon Ground Cinnamon
Pinch Nutmeg
Graham Cracker Pie Crust (I used store bought)

DIRECTIONS

Pre-heat oven to 325°.

Cream together cream cheese, sugar and vanilla using either a hand mixer or stand mixer until totally creamed and smooth. I gradually worked my way up in speed to ensure all lumps are out.

Add in ONE egg at time - mixing throughly before adding the other.

Pour about half of the batter into a graham cracker pie crust.


Add in the pumpkin puree and seasonings and mix again.

Pour remaining batter into pie crust.


Place on a foiled backing sheet and bake on middle rack for about 35-40 min. Sides should be set and center just a little jiggly.

Let cool on counter for 2-3 hours before covering and placing in fridge for at least 8 hour. I usually wait 24hrs.

Could add a dollop of whipped cream but rich and delicious as is.

Enjoy with your friends and family!

Follow

THE BEST CARROT CAKE EVER

 
IMG_4705.jpg

This cake is very special to me. It's a recipe that my Mom has been making forever. It's so good that she even had this recipe as her wedding cake. It's the cake I always make for my husband's birthday. I was first reluctant to share this "secret", but it's really too good not to. I know that all carrot cakes aren't created equal, but this one really takes the...cake. Plus, there's nothing better than a homemade cake... even if you're not really a cake person, like me. 

Carrot Cake is wonderful because it's an anytime type of cake. It can be for birthdays, weddings, bbq's, or you can even have it for breakfast, if that's your thing. This one is a little different, but hear me out: PINEAPPLE. This is not a pizza, so don't freak out. A little bit of pineapple goes a long way and keeps the cake moist without overpowering. I also add a bit of coconut, which gives a subtle flavor with a little texture, since I prefer to make this without nuts. And lastly... The Orange Cream Cheese Frosting! Adding a splash of fresh-squeezed orange juice and a bit of orange zest is really the show stopper. You and all of your fellow cake-eaters will be hooked.

Now, this is a cake you should make ahead of time. Meaning, if you want to make it for a party, I recommend baking the cake layers the night before and placing them in the fridge or freezer. My theory has always been that cake tastes better the next day - plus, it's easier to frost when the cakes are firm. Don't worry, however, it can be made and devoured in the same day if you're in a rush.

_MG_5701.jpg

WHAT YOU'LL NEED FOR THE CAKE:
2 cups flour, sifted
2 tsp baking powder
2 tsp ground cinnamon
1 1/2 tsp baking soda
1 tsp salt
1 cup canola oil
2 cups sugar
4 eggs
2 cups grated raw carrots (I like to use rainbow)
1/2 cup sweetened shredded coconut
8 oz crushed pineapple, drained

_MG_5713.jpg

Preheat oven to 350 and grease/flour two round nine-inch cake pans, and set aside.

In a medium bowl, sift flour. Add baking powder, cinnamon, baking soda, and salt. Resift. Set aside.

In a large bowl, beat sugar, oil, and eggs.

Begin to mix in flour mixture slowly. Try to not over mix. Batter should be thick at this point.

Mix in grated carrots, coconut, and pineapple.

mixsbs.jpg

Evenly pour the batter into both pans and place into the oven.

Bake for 25 minutes and then check to see if the center has set and toothpick comes out clean. Depending on your oven, you may need a little more time but keep an eye on it. No one likes burnt cake.

Once set, remove and cool. Once cool enough, remove from pans and let cakes finishing cooling on racks. 

Pro-tip: If you are making these ahead of time to freeze, make sure cakes are FULLY cooled before wrapping in plastic/foil and placing in fridge or freezer. Any residual steam will make the cakes soggy.


WHAT YOU'LL NEED FOR THE FROSTING:
1 stick unsalted butter, room temp
1 package regular cream cheese, room temp
1 tsp vanilla extract
2 cups powdered sugar
1 tsp fresh squeezed orange juice
1 tsp orange zest

In a large bowel, mix butter and cream cheese.

Add in vanilla and beat until fluffy.

Gradually add in powdered sugar, orange juice and orange zest and mix until well combined.

Depending on your taste, you can add in extra orange juice and zest.

Pro-tip: Before frosting the cake, I like to line my plate or stand with four strips of parchment or wax paper to keep things clean. Then I place the first layer on top. 

_MG_5760.jpg

Spoon a generous amount of frosting on the top of the cake and smooth out to the edges.

Carefully place second cake layer on top and repeat.

For the sides you can add as little or as much as you want, depending on what style you are going for.

Once you have added the frosting, carefully remove paper from the bottom and throw away.

Lastly, decorate your cake any way you like and you have yourself THE BEST CARROT CAKE EVER! 

_MG_5789.jpg
_MG_5775.jpg
_MG_5772.jpg

Follow


SKINNY "PALETAS"


It's SUMMER! And today is the 4th of July!
The Paleta. Being from Los Angeles these sweet treats are no stranger.  But knowing now how harmful sugar is, I wanted to make something sweet, fun, and guiltless for this holiday and well.. whenever!  May I present: the skinny "paleta"!

I am so glad these turned out (after a few trials and errors)!  These pops are sweetened naturally with only fruit and touch a honey and made from nonfat greek yogurt!  So you get your probiotic and protein in one!  I think I'll eat these for breakfast!  I made these to be "patriotic" for today but you can make them any way you want!

What You'll Need:
2 cups nonfat plain greek yogurt
Fruit of choice (I used strawberries, blueberries, & nonsweetened coconut)
2 tbs Honey
1/2 Lemon
1/2 c Water

Directions:
In a saucepan, bring 1/2 cup of water to a boil and then add 1 tbs honey and half a lemon's juice and stir until dissolved.  Set aside to cool.

Combine the zest of one lemon and the other tbs of honey to yogurt.

Set up your food processor or blender and combine one fruit at a time with about 3/4 cup yogurt and a few teaspoons of prepared water and blend.  Add more water to get desired consistency. You will want the mix to resembled melted ice cream (or soup).
 

Pour mix into mold leaving a 1/4 inch on top.
Tip:  If you want to make layers, pour each flavor one at time and place into freezer for at least 20 minutes before adding the next layer to prevent mixing.

Place mold into freezer and let sit for about 30 minutes before adding the sticks.

Let freeze 8 hours or overnight.

When ready to serve, remove mold from freezer and let sit for about 10 minutes then runs sides under warm water to loosen up.  

Remove each Popsicle carefully and serve immediately! Enjoy!

Follow